 Lukas Z's Blog
This kept me busy for a while until I found a super simple way to do it: In this tutorial/code-snippet I’ll show you how to write an image-cropper for your iPhone-app.
What do I mean by image-cropper?
Bascially, it’s about giving your users a simple way to select part of an image using pan and pinch gestures. This can be handy when they upload a profile picture or something similar.
Here’s the end result:
How it’s done:
There is one UIScrollView with a large contentSize. Embedded in the scroll-view is a UIView (baseView). And embedded in the baseView is the UIImageView with the Ferrari-picture.
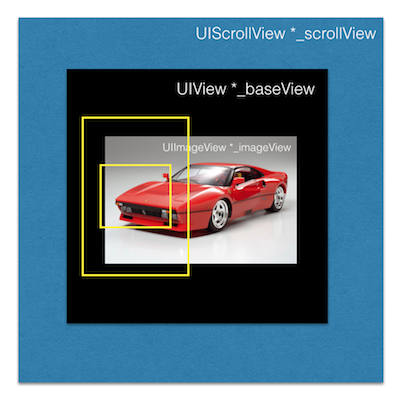
The yellow boxes in the above image represent the iPhone screen and the cropping area.
Because the contentSize is bigger than the bounds of the screen (= frame of _scrollView), the user can pan to select the desired image. Because minimumZoomScale and maximumZoomScale are set, the user can pinch to zoom. (Although I am not sure why it helps to set the initial zoomScale after all other initialization. If it’s done earlier it won’t scroll until zoomed.)
The actual cropping is done by rendering the contents of the view-controller’s view into an ImageContext and then cutting out the portion that (here: roughly) corresponds to the non-dimmed “window” in the center.
The image is then saved to the phone’s photo gallery.
Get the example project from Github and take a look at the code. It’s actually very simple and self-explanatory.
Here’s the actual cropping code that is executed when you tap the “OK”-button.
- (void)pickResult:(id)sender // ehm.. not sure why I needed sender here.. ;)
{
  // some visual feedback a.k.a. special effects:

  _acceptButton.enabled = NO;

  _specialEffectsView.alpha = 1.0f;
  [UIView animateWithDuration:1.0f animations:^{
    _specialEffectsView.alpha = 0;
  } completion:^(BOOL finished) {
    _infoLabel.alpha = 1.0f;
    [UIView animateWithDuration:1.0f animations:^{
      _infoLabel.alpha = 0;
      _acceptButton.enabled = YES;
    }];
  }];

  // 1. hide stencil overlay

  _stencilView.hidden = YES;

  // 2. take a screenshot of the whole screen

  UIGraphicsBeginImageContext(self.view.frame.size);
  [self.view.layer renderInContext:UIGraphicsGetCurrentContext()];
  UIImage *screenshot = UIGraphicsGetImageFromCurrentImageContext();
  UIGraphicsEndImageContext();

  // 3. pick interesting area and crop

  CGImageRef imageRef = CGImageCreateWithImageInRect([screenshot CGImage],
                                                     CGRectMake(35.0f, 159.0f, 248.0f, 248.0f));
  UIImage *croppedImage = [UIImage imageWithCGImage:imageRef];
  CGImageRelease(imageRef);

  // 4. just for fun, resize image by factor 2

  UIImage *resizedImage = [croppedImage resizedImageToSize:
                           CGSizeMake(croppedImage.size.width * 2, croppedImage.size.height * 2)];

  // 5. save result to photo gallery

  UIImageWriteToSavedPhotosAlbum(resizedImage, NULL, NULL, NULL);

  // 6. show stencil view again

  _stencilView.hidden = NO;
}
Very straightforward stuff.
But as I said, it took me a while. For some reason I never thought of taking a screenshot first.. ;)
Also this solution has the limitation of pixel size. If you want to crop an image of for example 10000 times 10000 pixels and get half of it, you would expect a 5000x5000 pixel result. However, because of the screenshot technique, the cropped area will never be bigger than the pixels on the iPhone screen.
P.S.: You can follow me on Twitter.